Sunday 29 November 2009

One Sheet Wonder

I know…2 posts in one day…a miracle! LOL

A One Sheet Wonder (OSW) is a set of cards made using only one sheet of A4 card as the main focus of the card. You can stamp it or use a piece of Designer Series Paper (DSP). This is an example of a OSW using a piece of DSP. I chose a sheet from Stampin’ Up!’s Holiday Treasure. I cut the sheet to A4 size and then cut it up into smaller bits. I have a template sheet that I will send to you if you are interested…just send me an email.

 IMG_0838IMG_0839

IMG_0837  

IMG_0840 IMG_0841

IMG_0842 IMG_0843 IMG_0836

The card bases are all Confetti Cream and I used the colours from the DSP to decorate- Ruby Red, Chocolate Chip, Baja Breeze and Old Olive. I then added some images from my Christmas stamp sets and a variety of embellishments to complete the cards. You can add as many different embellishments that you like..or none at all and just let the feature paper be the star of the card.

It is a very easy way to make a lot of cards  quickly! I hope you enjoy them!

Cheers

Chrissie

Bad Blogger

Sorry Everyone for my slackness in not updating my blog for sooooo long. This time of year is just bedlam for me. We went away on holidays at the start of October for 2 weeks and then I had to come back to work and get organised to write the Music report cards for the 800 kids at my school. On top of all that, I had classes and workshops to plan and deliver, literacy training to attend, concerts for dancing and at school! It sure has been busy!!

To start off, I will show you the projects that we made at my World Cardmaking Day back in October. These first 4 projects were the Stamp-a-Stack that we did.

IMG_0745 IMG_0744

Stamps: Bugs and Kisses                                                                             Inks: Really Rust, More Mustard, Close to Cocoa, Always Artichoke, Chocolate Chip                                                                                  Cardstock: Very Vanilla, Really Rust, Always Artichoke, More Mustard, Close to Cocoa                                                                     Accessories: Chocolate Chip Ribbon, Scallop Oval Punch, Large Oval Punch


 IMG_0746 IMG_0752

Stamps: Season of Joy                                                                                 Inks: Cameo Coral, Certainly Celery. Blush Blossom           Cardstock: Cameo Coral, Certainly Celery, Whisper White Accessories: Celery Grosgrain Ribbon, White Taffeta Ribbon


IMG_0747 IMG_0748 IMG_0750 IMG_0751 

Stamps: Just Beachy                                                                                     Inks: So Saffron, Old Olive, Ballet Blue, Regal Rose            Cardstock: Confetti White, So Saffron, Old Olive,  Regal Rose,         Ballet Blue                                                                                                           Accessories: Scallop Circle Punch, 1 3/8 Circle Punch, 1 1/4 Circle Punch

IMG_0749

Stamps: Petal Pizzazz, Everyday Flexible Phrases                                                                                                                       Inks: Only Orange, Real Red, Yoyo Yellow, Green Galore Cardstock:  Whisper White, Only Orange, Real Red Green Galore (not in photo)


So that is all for today. I have heaps more to show you but it will have to wait for tomorrow. There is a big storm about to hit!

Cheers

Chrissie

Monday 28 September 2009

Happy Holidays

It is the school holidays here in Queensland and just before it started I decided to make some little gifts for my friends at school. In Australia, we don’t really use the expression Happy Holidays at Christmas time so I thought that I would use this stamp to wish everyone a happy holiday.

I used Kraft cardstock and lots of different colours for the little birdie from Cheep Talk stamp set (these ones are Old Olive and Riding Hood Red). Then I just put some lollies in a bag and stapled the bag topper on.

It did give everyone a lift to start their holidays!

Cheers

Chrissie

Friday 18 September 2009

I’m Still Here

I know it has been ages..but life has been getting in the way of crafting and blogging. I do have something to share with you today.

A couple of weeks ago I had the privilege to be the entertainment at a 12 year old girl’s birthday party. The 7 girls that attended Maddie’s party were just delightful and very keen scrapbookers.  I decided that we would decorate a paperbag album. To prepare for the party, my friend Sherri (who is a scrapbooking wonder) came over and we designed 8 pages and then I chose 4 of them for the girls to make. I then made up all the pages and made a special album to give to her as a birthday present.

For this album I really stepped out of my comfort zone and only used Bold Brights. We chose lots of different stamp sets and really basic layouts. Each page had a black mat for the photos and on the smaller, middle pages, we used a white mat for journaling.

The girls did a fantastic job on their albums… they even changed my designs a little to suit their personalities. I had a great afternoon with them and look forward to “playing” with them again.

Cheers

Chrissie

Sunday 2 August 2009

James Turns 4

My DS James turned 4 last weekend and we decided that we would give him his first birthday party with friends other than his cousins and family. We invited some of his friends from daycare to come to a Pirate Party at Hungry Jacks. We had 9 boys and girls come and he had a fabulous time.

When it came to the lolly bags, I procrastinated for a very long time. I have heaps of cute little girl designs but boys still manage to stump me. I did think of making little treasure boxes but the first one I made seem to take ages to make and I didn’t really have time to make 15 of them. So I went to SCS and made a 2, 5, 7, 10 box. It was quick and easy and I got to use my new Choo Choo set.

IMG_0621

I used some non-SU scrapbooking paper that I had lying around and used the off-cuts to matt the picture. I stamped the train and then inked around the edge of the white card. 

Not my most creative project but, to put it into perspective, they were for 4 year olds. They were not that excited by the box…but what was inside it.

I hope you all have a great week!

Cheers

Chrissie

Saturday 1 August 2009

Stamp-a-Stack

Two weeks ago I held my monthly card class and this month it was a stamp-a-stack. We made 4 each of 3 designs.

IMG_0615

This card involved very little stamping at all! I chose the stripey  paper from the Washington Apple DSP and we then punched out stars in co-ordinating colours. We used the scallop edge punch along the bottom of the the DSP and added a strip of Riding Hood Red card.

IMG_0616

Have you got  the impression that I  love the butterfly from the Great Friends set? Well I do!! I used Pink Pirouette, Regal Rose and Kiwi Kiss card and ink. We used the leaf sprig as a background stamp and used the Eyelet border punch to give a decorative edge to the Kiwi card.

IMG_0617

For the last card, I went a little out of my comfort zone and chose brighter colours: Old Olive, Summer Sun, Ballet Blue and Pixie Pink. I just love the animals from the In the Wild stamp set. We stamped the animals and then layered them on matching squares. We used the large oval and scallop oval punches to mount the greeting.

The girls all had a great time.

Cheers

Chrissie

Friday 31 July 2009

More Butterfly Boxes

My DS James (4) and DD Hayley (6) both loved my butterfly box from my last post. So when it was time to go back to school (yes I know that what nearly 3 weeks ago…I said I was a bad blogger LOL), they wanted me to make them a box to give to their teachers. For my DS that meant making 3 boxes. So being the good mummy that I am, I obliged and also made some chocolate chip biccies to go inside.

IMG_0588

IMG_0589

I got some of my beautiful Pink Flamingo DSP and used that as my colour palette- Cameo Coral, Tempting Turquoise, Real Red and Summer Sun.

I used a sentiment from the Hostess Set called Best Yet and punched it out using my large oval punch and then layered it using the new scalloped oval punch.

They were very easy to make and  greatly received. I hope you like them too! And I promise… no more butterfly boxes for a while. LOL

Cheers

Chrissie

Thursday 30 July 2009

Butterfly Box

First let me say sorry for being a slack blogger. I have been very busy for the past few weeks with classes and my DS James’ 4th birthday. I will be posting lots of photos over the next few days of the projects I have been making.

My first project is a butterfly box that I found at SCS. It is very pretty and I just had to make one.

IMG_0582

I have used Baja Breeze cardstock for the base of the box and Bella Bleu DSP that I inked around the outer edge to give it definition. I stamped the butterfly from Great Friend in Baja Breeze and added the greeting from On Your Birthday.

I hope you like my butterfly box!  I had a lot of fun making it!

Cheers

Chrissie

Saturday 11 July 2009

New Toys from Stampin’ Up!

As a demonstrator, I get a preview of the new mini catalogue that is starting next month and I also get to buy from it early. On Monday my box of goodies turned up! In it was a new set call Great Friend and I just love it!  I have already made a card and a little box using it… but you will have to wait to see the card for a little while yet! Sorry!!

Now I seem to be in a pink mood. Not sure why but the little box I made is also pink. 

IMG_0581

I got the template from the demo side of the Stampin’ Up! website, printed it onto Pink Pirouette cardstock and cut it out! I then stamped the butterfly image from the Great Friend stamp set in Regal Rose and cut it out. I then stamped the words from this set in Kiwi Kiss and Regal Rose and punched it out using the Designer Label Punch. It is all ready to be filled with chocolates or lollies or chocolates…..mmmm chocolates! and give it to someone special!

Took about 15 minutes to make and it is very pretty!

Cheers

Chrissie


Thursday 9 July 2009

Scrapping Pages

As many of you know I am not really a scrapbooker. I just can’t seem to put the pages together so that I am pleased with the finished product. On Tuesday, my friend Sherri came over and helped me scrap some pages using the Rock-a-bye Girl Simply Scrappin’ kit. Sherri just seems to have a knack of putting the elements together so I am sure I will be spending many more hours with her!

IMG_0569

We used the card and the stickers from the Simply Scrappin’ Kit and added some of the new corduroy buttons that will be in the new Spring Mini coming out in August and some Pink Pirouette grosgrain and Pretty in Pink Taffeta ribbon.


IMG_0571

The second one was a double page spread. Again we used the card and sticker from the Simply Scrappin’ Kit and added some Kiwi Kiss satin ribbon and the butterfly stamp from the Great Friend stamp set also in the new Spring Mini.


I am really pleased with my efforts. The Simply Scrappin’ kit made it so easy to put the pages together as everything was all co-ordinated. Thanks Sherri for your guidance. You are the best!!

Cheers

Chrissie

Thursday 2 July 2009

Retired Stamp Sets for Sale

While I have been on holidays, I have had a huge clean out of my stamp room and now I have a heap of stamps for sale at bargain prices– many below half the price I bought them for. Let me know if you are interested in buying any of the sets. I will pop them in the mail for you for $5.00 postage. Not sure what the set looks like? Hop over to Splitcoaststampers and look in the gallery to see pictures of all these stamp sets. Once they have been sold, I will change the colour to red and put a line through it.  Happy Shopping!


Set Name Original Price Sale Price
In the Spotlight Hostess $15.00
For A Friend Hostess $15.00
Party Punch Hostess $15.00
Terrific Tags Hostess $15.00
Springtime Stems Hostess $15.00
So Many Sayings Hostess $15.00
A Little Bit of Happiness Hostess $15.00
Spring Solitude + Wheel Hostess $25.00
Warmest Regards Hostess $15.00
Botanical Blooms SAB $15.00
Polka Dot Punches SAB $15.00
Alphabits $29.95 $15.00
A Little Love $33.95 $15.00
Crab and Company $52.95 $25.00
Festive Favourites $45.95 $25.00
Polka Dot and Petals $33.95 $15.00
Looks Like Spring + matching punch $57.95 + $30.95 $40.00
Be Happy $39.95 $20.00
Live Your Dreams $55.95 $25.00
Happiness $33.95 $15.00
Bold Butterfly $57.95 $25.00
Wildhearts B/G $33.95 $15.00
In the Wild $39.95 $25.00
Wonderful Words $39.95 $20.00
Bud Basic + matching wheel $33.95 + $15.95 $25.00
Sweet Serendipity $35.95 $15.00
Girlfriends $33.95 $15.00


Cheers

Chrissie

Sunday 28 June 2009

Changes to my Blog

I am sure that you have noticed some changes to my blog! I decided that my banner was looking a little tired and needed a make over. Now I am not that computer savvy and the last time I put a new banner on, my big sis helped me to do it. And I kind of watched her do but really I had no idea.  So I went in to Publisher and had a play. I kind of knew what I wanted it to look like, and after 20 minutes my new banner was done!

I have also wanted to change the layout of my blog. So I went to this site and it had very clear instructions on how to change my blog to 3 columns which I was able to follow. (Absolute miracle because I have never managed to change anything about my blog before.) So now I am going to work on adding a cool background to my blog. Keep watching!

And finally, the last change I have made is I am now using Windows Live Writer to post to my blog. It makes it sooo much more easy to do as I can now add photo collages (like in the last 2 posts); I can add smileys; Hot and a heap of other things that I haven’t even learnt how to do yet! LOL!

I hope you are all having a fabulous weekend! I am on holidays for the next 2 weeks, so hopefully I will get lots of projects made and shared here.

Cheers

Chrissie

Hubby’s Birthday Card

For my birthday this year, I gave my DH my catalogue with all the things that I have bought marked off and a list of the things that I would like and said go for it! I had to show a lot of restraint by not looking at the order he had placed until it was my birthday. Funnily enough, he didn’t get one thing on my list but instead bought me some stamps that he liked and he thought went with the stamps I already had. Two of the sets he bought were the accessory sets for All in the Family so when his birthday came around a month later I decided to make a card with myself and the kids on it!

It was a lot of fun making our little family. My DS James has just started to play soccer and my DD Hayley does dancing so it was easy to dress them up.  It was also super easy to colour the images in with my SU markers.

Cheers

Chrissie

Saturday 27 June 2009

Happy Birthday Sis

My sister Sharyn and my hubby both share the same birthday so I thought  I would show you the card I made for my sister today and the card for my hubby tomorrow. I have seen many examples of this type of card at SCS and wanted to try it for myself but I didn’t quite do it the same way.

Firstly, I stamped the rose image from Fifth Avenue Floral 4 times in Versamark on watercolour paper and then embossed it using white embossing powder. I spritzed each image with a little water and watercoloured the flowers using my aquapainter and ink. The colours I used were Regal Rose, So Saffron, Pink Pirouette and Pixie Pink. I just added colour to the petals in a random pattern adding more ink in some areas and less in others. I then cut out sections of the 4 roses and layered them I then paper pierced the Regal Rose mat and layered it with So Saffron and Whisper White. I stamped the So Saffron card base with the rose stamp in Versamark and added a greeting from It’s Your Birthday.

I was really happy with how the card turned out and my sister was thrilled.

See you tomorrow with my next card.

Cheers

Chrissie

Friday 26 June 2009

Miss Amanda

One of my DS’s preschool teacher left today to have her 2nd baby. Miss Amanda has been just brilliant with James. She takes none of his rubbish and has not been taken in by his dazzling smile and his “I wouldn’t do that” ways. LOL So I decided that I would make her a little gift box filled with baby goodies. Now I got the template for the box from Sue Denning. I just love how simple her instructions were to follow and how easy it was to make. IMG_0561

IMG_0562

For the box, I used Ruby Red and So Saffron Cardstock and Washington Apple DSP. I stamped animals from  In the Wild in co-ordinating colours to decorates the box. I also used some Apricot Appeal and Bashful Blue ribbon to finish it off.

IMG_0565

I also made a card to go with the box using the same colours and left over bits that didn’t make it to the box. The only thing I added was some Riding Hood Red taffeta ribbon.

Miss Amanda loved the box and was touched by the gift. Thanks so much to Sue for sharing your great gift box.

Cheers Chrissie

Sunday 21 June 2009

Stop Looking... I Found it!

Earlier in the week, I said I had lost my mojo...hating everything that I made. It didn't seem to matter what I did, I didn't like it. And I know that we are our own worse critics. But out of the many rejects, there was one card that I did like. But one card does not make a class. So I decided that I would take that one card and turn it into a class. And here is result. We made the same card 5 times...but in different colours and with different embellishments. I also used the same basic design and decorated the very simple box to put our cards in. And I mut say that I am thrilled with the results.

Each of the cards has the same basic design... weathered background stamp... a couple of layers, some ribbon and a scalloped circle centre piece. Each card used different stamps from the Circle Circus stamp set to decorate the edges of the top layer. We used the large scalloped stamp from this set as the basis of the centre piece but added a different embellishment each time.

This is card that started off the idea. I cannot be sure that I didn't CASED it from somewhere but for the life of me I cannot say where. I have looked in all the places I went last week but to no avail. I am not sure that I didn't get the idea from a number of cards and made it my own...but if I did CASE it from you...please let me know.

Colours: Cameo Coral, Ruby Red and Pink Piroette.
Ribbon: Pink Piroette striped ribbon.
Embellishment: Jumbo Pewter Eyelet.


Colours: Orchid Oppulence, Elegant Eggplant, Pale Plum.
Ribbon: Elegant Eggplant grosrain ribbon.
Embellishment: Purple square Rhinestone Brad.


Colours: Brocade Blue, Night of Navy and Baja Breeze.
Ribbon: Night of Navy grosgrain ribbon.
Embellishment: Brocade button (retired)


Colours: Kiwi Kiss, Garden Green and Certainly Celery.
Ribbon: Kiwi Kiss satin ribbon.
Embellishment: green Supernova Glitter.


Colours: Tangerine Tango, Summer Sun and Apricot Appeal.
Ribbon: Apricot Appeal grosgrain ribbon.
Embellishment: Dazzling Diamonds.


And here is the box. It was made out of Cameo Coral cardstock and we used the same basic design as the card...minus the scallop circle centre piece.

Well I hope your like this little set. The ladies at my class sure did.
Cheers
Chrissie

Thursday 18 June 2009

Has anyone seen my Mojo??

Hi all... I seem to have lost my mojo for the last few weeks. I absolutely hate everything I have made lately! I even cased some cards off the internet and I hate them too!!!! Wwwaaaahhhh!!!
I have a class on Sunday so I hope I find it soon...really soon! I will post pictures when I finally decide on what we are going to do!
I hope you are all having a good week and I will be back on Sunday with some piccies!
Cheers
Chrissie

Sunday 7 June 2009

Australasian Scrapbooking and Papercraft Expo

For the last 2 days I have been working at the Australasian Scrapbooking and Papercraft Expo at the Brisbane Convention Centre. It has been amazing! My upline Kimmy organised our stall and myself and 3 other ladies in her team have worked together to put our stall together. I have to say a huge THANK YOU to Kim as she has worked day and night for the last 2 weeks putting together information booklets and sample bags to sell at the stand. She also designed the great card for our make and takes which has been a great hit with everyone who joined us and made it.


This is our stall. While we all contributed to the display- making cards, scrapbook pages and 3D items, most of the fantastic work on the walls was made by Kim.


This is the table at the front of our stall where we did our demonstrations and the make and takes. It is a little hard to see, but our make and take is at the front of the table. We used the set Circle Circus and 4 of the new In Colours.


Here we are on the first day just before the expo started. From the left is Vanessa, Me, Jenny and Kim.

I have met some great ladies over the last 2 days and I hope to catch up with some of them again soon. If you are going to the Expo tomorrow, don't forget to drop in and say hello!
Cheers
Chrissie

Thursday 28 May 2009

Report Cards

It is that time of year when teachers all across the state are writing report cards. It is a huge task for me as I teach over 800 children each week and I have to report on over 730 of them. As you can imagine, the sheer number of them makes it a time consuming job... leaving very little time for card making. I will be back in a few days... I will have to to keep my sanity! LOL!
Cheers
Chrissie

Sunday 17 May 2009

Swaps Part 2

Here are the other 5 swaps I made for Convention.

This is a fabulous st for the men in our lives. I saw this idea on SCS but I now can't find where. (Isn't it always the way??)

Stamps: Totally Tools, Polka Dot
Inks: Basic Brown, Basic Black
Paper: More Mustard, Ruby Red, Chocolate Chip, Whisper White
Accessories: Old Olive, Pumpkin Pie, Summer Sun, Sahara Sand, Going Grey Markers


This is a very simple card but it is very effective. I usually have a lot of trouble tying a bow with the wide ribbon but tying a simple knot in the middle was easy!

Stamps: Pocket Silhouettes, Sanded
Inks: Night of Navy, Brocade Blue, Versamark
Paper: Night of Navy, Brocade Blue, Whisper White
Accessories: Brocade Blue 5/8" Ribbon, Word Window Punch, Large Oval Punch


I love this Hostess set! It is just so versatile. I also love how the red pops out of the grey backgrounds.

Stamps: Live Like You Mean It
Inks: Basic Grey, Real Red
Paper: Basic Grey, Whisper White, Basic Black
Accessories: Red Gingham Ribbon, Scallop Punch, 1 3/8" Circle Punch


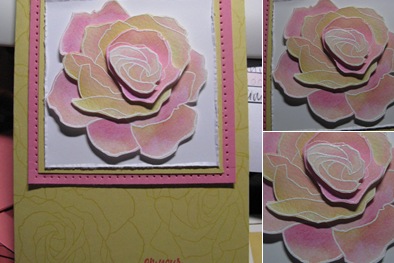
This is my absolute favourite set right now. There is just soooo mcuh you can do with it. You can use any colour combination and it just works! For the ribbon in the middle, I again used the faux suede technique and I also made the faux brads for this card too!

Stamps: Fifth Avenue Floral
Inks: Baja Breeze, Sahara Sand
Paper: Kraft, Baja Breeze, Very Vanilla, Close to Cocoa
Accessories: 1/4" circle punch, Crystal Effects


For this card, I definitely got my inspiration from SCS. There are many talented ladies who have made cards just like this and I thank you all. To make the reeds, I used the Horizontal Slot punch. It is just so easy and it finished off the card beautifully.

Stamps: Inspired by Nature
Inks: Kiwi Kiss, Always Artichoke
Paper: Kiwi Kiss, Always Artichoke, Confetti Cream
Accessories: Always Artichoke Ribbon, Horizontal Slot Punch


Well I hope you like my cards! I had a lot of fun making them and I got some great cards back in return.

Cheers
Chrissie